Archive for the ‘ Tech Tips ’ Category
Foreshortened Dimensions: How Do They Work?
Usually when detailing a drawing, we will add a detailed view. Dimensioning this view can be a difficult task, but SolidWorks is always working to make that task easier. One of the tools they have given is an option called foreshortened dimensions. This option allows for the dimension of a radius or diameter to be placed into the view, without regard to the center line or the center point of the part. Please watch the video attached to see how this option works.
SolidWorks 2013 Sneak Peek!
One of the SolidWorks 2013 Sneak Peek Features from the SolidWorks Blog…
In SolidWorks 2013, you can exclude selected components in Interference Detection. You can filter components with matching cosmetic threads from Interference Detection results and place them in a separate folder. You can exclude interferences involving hidden components, as well as exclude selected components from Interference Detection results. Optionally, you can specify to remember components to exclude from session to session. This video shows how this applies to cosmetic threads.
You can visit the new SolidWorks 2013 website to see all the major updates and check out more videos. In the meantime, if you want to learn more about how SolidWorks can help your business, check out the videos in the Demo library.
If you are in the surrounding Tulsa area and are interested in SolidWorks, you can sign up for our 2013 Launch Event here!
SAVE THE DATE for SolidWorks 2013!
Reserve Your Sneak Peek at 3D Design Simplified!
OCTOBER 2, 2012
Come to a SolidWorks 2013 Launch Event and see powerful new products and features that make your design process even more productive:

– New products and design tools to simplify complex tasks
- – New tools for easier and faster model creation
- – Wider connectivity to expand collaboration
- – And much more!
Early Registration is Open – RSVP now!
**Be on the look-out for more details to come!**
918-599-7500 | sales@engatech.com | www.engatech.com
Related articles
- Bringing the Human Element to Robotics (engatech.wordpress.com)
- SolidWorks 2013 Beta has been released! (engatech.wordpress.com)
- SolidWorks eDrawings App for iPad! (engatech.wordpress.com)
- SolidWorks Helps to Develop Advanced Packing Technologies (engatech.wordpress.com)
SolidWorks eDrawings App for iPad!
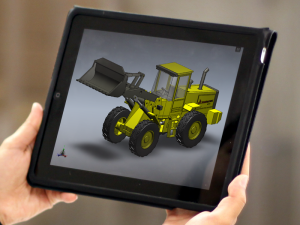
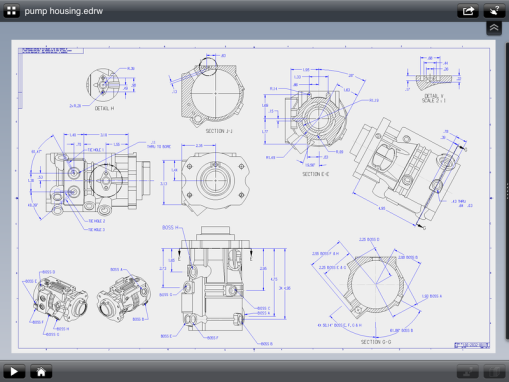
eDrawings is the only CAD viewer on iPad that allows you to view native eDrawings files as well as native SolidWorks parts, assemblies and drawings files. In addition, eDrawings allows convenient viewing of DWG and DXF files.
Multi-touch gestures let you pan, zoom, and rotate models easily. eDrawings also supports configurations, drawing sheets, and exploded views for eDrawings files published from SolidWorks and all other supported CAD software.
Features:
- Open files from email, iTunes File Sharing, network
- Zoom, pan and rotate your 2D or 3D CAD data using multi-touch
- Animate 3D standard views as well as 2D drawing views.
- Browse your assembly components tree, configurations and drawing sheets
- View your designs in full screen and double tap to fit it on screen
- Store your files on your iPad through iTunes Files Sharing
- Intuitive and easy-to-use user interface
- Sample files included
Since the initial release on May 1, an update is now available, with the following changes:
- Transparent parts
- Standard orthogonal views
- Shaded with edges mode
- Perspective mode
- Hide, show & make components transparent
- Select components from graphics area
- Hyperlinked views in drawings
- Sort files by name, extension, date and size
- Leave file open during background execution for fast app switching
- Fixed shaded drawing views during panning and zooming
- Fixed incorrect legends in SolidWorks Simulation files
- Bug fixes
Mobile Tips for 3DVia Composer
…. a tip from Earl Hasz, Technical Sales Expert with SolidWorks:
I am frequently asked about what can be done on the shop floor with respect to mobile devices, given that Composer Player requires Internet Explorer and mobile devices typically do not support the Windows OS. There are a couple of different options that we can look to for these devices.
1. Setup static images that are included with existing PDF or HTML pages showing the operations
- This is the typical first step that I have seen. Basically leveraging existing processes and using Composer to create the content rather than resorting to digital pictures or CAD screen shots.
- The mobile device is irrelevant as we are leveraging existing processes.
2. SVG output provides the next logical step and adds some interaction
- All of the latest HTML browsers support SVG viewing. Thus the Composer author can create SVG files with hotspots to show either text or URL links to additional pages for next operations
- Again mobile devices all have browsers that can support this functionality
3. Publishing the Composer Player content is the most interactive solution
- This form can either be shown on its own or embedded in an HTML page
- The Composer Player requires the Windows OS on its own or the use of Internet Explorer for the HTML solution
- Mobile tablets that run with the Windows OS should work fairly well providing their graphics chipset supports OpenGL 2.0
4. Mobile devices that are running iOS or Android OS require the use of an app such as AirDisplay
- AirDisplay sets up your mobile device as a secondary display, providing it resides on the same WiFi network
- This allows the operator to interact with the Composer Player or HTML solution on the workstation from their mobile device
- I had a customer show this implementation to me. They were preparing to provide each assembly cell with an iPad and workstation. The Composer file was set up in such a way so that the operator could point to a given component in the viewer and see the basic assembly information in the tooltip that popped up. All of the components were setup with this basic information by the Composer author.
New Feature in SolidWorks 2012
New to SolidWorks 2012 is a featured called Span Displays.
When you have multiple displays, you can use the Fit to buttons to fit a document window into the available area in each display. For example, you can fit a document window containing an assembly on one display and a document window containing a part from that assembly on the other.
When you have a single display, you can use the Fit to buttons to fit one document window to the left side of the display and another document window to the right side. This is particularly useful when you have more than two documents open because it lets you arrange only two of the documents. ( Windows > Tile , in contrast, would arrange all the open documents).
Quick SolidWorks Tip – Extending a Line using the Trim Entities Tool
This is a great SolidWorks Tech Tip from The SolidWorks Geek Blog that we wanted to pass along.
Trimming and extending lines is one of the first skills that any CAD user must learn. The process is pretty straight forward; the Trim Entities tool is used to trim sketch entities to the nearest intersection and the Extend Entities is used to add length to a sketch entity until it meets another sketch entity. It is not uncommon to have s ketch that requires the user to switch back and forth from the trim to extend tools a few times during the sketch creation. But there has got to be an easier way, right?
Did you know that you do not need to switch between these two tools? As crazy as it sounds, you can use the trim to to extend sketch entities as well. Today’s Quick Tip will show you how that can be done quickly and easily.
1. The sketch below shows a couple of lines that need to be trimmed or extended to make a single rectangle. Yes I know it would be easier to just use the Rectangle tool, but this is just an example. Click here to read the rest of this tech tip.
New in SolidWorks 2012: Installation Manager Enhancements / Complete Uninstall
SolidWorks 2012 includes several enhancements when it comes to using the installation manager. You can now completely uninstall the SolidWorks software or customize the software removal by removing one or more of the following items: Program Files and Folders, registry entries, data folders such as SolidWorks Toolbox, and previously downloaded installation files and folders. By default, the SolidWorks Installation Manager removes Program Files and Folders.
- To uninstall SolidWorks in Windows Vista and later, click Start > Control Panel > Programs > Programs Features . For Windows XP, click Start > Control Panel > Add or Remove Programs .
- From the Summary screen in the SolidWorks Installation Manager, click Change. Select items to remove from the Advanced Options screen.
You can specify which standards to support before installing the SolidWorks Toolbox. By default, all standards are selected for a new installation of the Toolbox. To select standards:
- In the Summary screen, expand Products and click Change.
- In the Product Selection screen, expand SolidWorks > SolidWorks Toolbox and select standards from a list.
The installation of the Workgroup PDM Server requires a validation code. The Installation Manager can obtain the code automatically. If an Internet connection is not available, you can obtain the code by email.
This is only one of the over 200 enhancements added to our 20th release of SolidWorks. Want to learn more? Just visit the SolidWorks 2012 website to learn about the rest of the updates for our 20th release.
Reducing Mouse Travel in SolidWorks
As I’m sure you all have noticed, the majority of systems require the user to deal with dialog boxes and windows. This means you are constantly going from dialog box to run your command, to your working area and then back to your dialog box. SolidWorks has done a great job in getting out and the way and letting the user focus on their design rather than the software. I’m going to show you some tips and tricks to save you time on your design process while eliminating window washing.
The first thing I am going to show you to prove that SolidWorks is geared towards efficiency is by simply turning of interfaces. If you push F9 and F10, SolidWorks will turn of your left and top interfaces. By doing this, you will more easily refrain from window washing and work in this area alone. You may be wondering, “How can I create my part if I can’t go and select my tools?” You can do this by using your pop up toolbar, shortcut bar, and mouse gesture wheel.
These three things house your commands at your fingertips, rather than window washing back and forth to dialog boxes and other commands. By turning off the interfaces, you no longer have to worry about letting the mouse follow your eyes to select the commands from the toolbars. Turning these off for a few weeks will help you to train yourself not to window wash across your monitor but rather to use the commands that automatically come to you. It’s not possible to do everything in SolidWorks without a dialog box, but you will be surprised at how much you can.
 You remember me talking about the pop up toolbar, shortcut bar and mouse gesture wheel, but what are these three features? The pop up toolbar (pictured left) appears when you click on an existing item. It gives you quick commands such as “edit feature” and “edit sketch”. With the pop up bar, you know longer have to go into your design tree to edit the different aspects of your part. However, unlike the shortcut bar and mouse gesture wheel, the pop up toolbar is not currently customizable.
The shortcut bar (shown below) appears when you push the “S” key. This houses what you need to create a new part (Extrude, Revolve, Etc…). This bar is fully customizable. To do so you simply push your “S” key> right click on the shortcut bar> click customize> drag and drop the items you wish to add onto the toolbar.
The mouse gesture wheel (pictured below) is used to run really frequent commands. To use this you simply hold down your right mouse and slowly drag is bringing up the mouse gesture wheel. This too is customizable. To customize this wheel go to tools> options> mouse gesture. There are many other ways to reduce mouse travel as well, these are just a few to get you started.


